# Download & Install
## Software Installation
Getting up and running takes just three easy steps:
1. [Buy a license from the store](https://store2.assimilateinc.com/) or [Sign up for a trial](https://register.assimilateinc.com/registration.aspx) to receive your trial license.
2. [Download](https://www.assimilateinc.com/download/) and Install the software.
3. Activate the license key that you received in your email, and paste it into Assimilate the first time you open the program.
{% hint style="info" %}
For license-related issues, check out this article: [Licensing the Software](/live-fx-documentation/general-troubleshooting/licensing-the-software.md)
{% endhint %}
### Operating System
Live FX is released as a 64bit application on both **Windows** and **OS X**. For Windows - version 10 is recommended. Windows Server variants have not been actively tested. The minimum supported version for OS X is 10.7.5.
## Installing the Software
The installer is typically downloaded from the Assimilate Support Site as a.zip or .pkg file. In the case of a .zip file, you need to unzip the file before you can begin the installation. The file can be unzipped using a default zip utility. Once the file is unzipped, there is a folder with two files in it.
For the Windows installer, these are AssimSetup64.msi and ReleaseNotes.txt. The OS X installer comes in the form of a .pkg file instead of a .msi file. The ReleaseNotes.txt file is copied into the main SCRATCH install directory by the installer. See below for more information about this file.
### **Windows Installation**
Live FX is installed using the .msi file. Double-clicking on this file launches the installer program. When the installer first launches, an initial dialog is shown, indicating that you are about to install Assimilate software on your system.
Installing Live FX is a standard Windows install:
* read the license agreement and confirm/agree to the terms
* set the install folder
* copy and install the program files
### **Mac OS Installation**
The install program in OS X is started by double-clicking the .pkg file and goes through a similar series of steps as the Windows install, standard to an OS X installation.
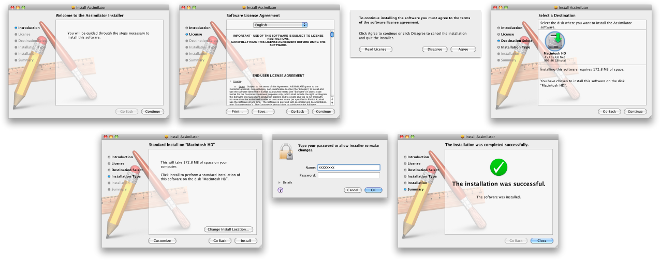
Installing Live FX is a standard OS X install:
* read the license agreement and confirm/agree to the terms
* set the install folder
* enter administrator credentials for installation
* copy and install the program files
## Upgrading Live FX
Live FX is updated regularly to add new functionality and improve existing features. To upgrade to a new version of the software, follow these steps:
1. **Back up** all project and user information. This information should be backed up regularly, but it is most important to have a backup version of your project information before installing a new version should you ever need to revert to a previous version for any reason.
2. Remove the software using Add/Remove Programs in the Windows Control Panel or move the app from the Applications folder into the bin under OSX.
3. Install the new version of the software by running the .msi/.pkg installer that was provided.
Note: A new Live FX license may be required when upgrading to new versions of the software. Check the Release Notes that are included with new versions of the software for information about licensing before beginning the installation process.
Note: It is most **important** that you check the **Release notes** of a new version to make sure it is fully **backward compatible** with the current version you are running. It is discouraged to switch to a new version while working on a project but rather wait to install the new version when starting a new project.
---
# Agent Instructions: Querying This Documentation
If you need additional information that is not directly available in this page, you can query the documentation dynamically by asking a question.
Perform an HTTP GET request on the current page URL with the `ask` query parameter:
```
GET https://assimilate.gitbook.io/live-fx-documentation/getting-started/introduction/download-and-install.md?ask=
```
The question should be specific, self-contained, and written in natural language.
The response will contain a direct answer to the question and relevant excerpts and sources from the documentation.
Use this mechanism when the answer is not explicitly present in the current page, you need clarification or additional context, or you want to retrieve related documentation sections.