User Settings Menu
 In the **Account** section below the Profile, you can link the Profile with an online Account. Use the **Sync** button to open the Sync Profile dialog for selecting an online account and synchronizing it with the local settings. The Sync Profile dialog is discussed later in this paragraph. The **Clear** button will unlink the User Profile and the User Account.
Use the **Remove Profile** button in the lower left corner to delete a User Profile from the local system. This will not affect the linked online account. Note that you can *not* rename an existing User Profile. In that case, just create a new profile and delete the original.
***
## Appearance Settings

**Scheme**
There are three options in the pull-down menu for Scheme:
* Color
* Mono
* Custom
These select the overall color scheme for the UI. Color applies the default color scheme for the UI. Mono changes the UI color scheme to a monochromatic style which creates less intrusion on the eyes while doing color work. Custom allows you to customize the color of individual elements of the UI and modify the overall text size and font for the UI. This is covered in detail in Chapter 11 – Customization.
**Color Cursor**
This toggle switches the cursor between the standard color style and a monochrome style. This is also useful for minimizing the intrusion on the eyes while doing color work.
Note: Warning and confirmation dialogs still appear in color. Also, other specialized interface elements are not monochromatic since their color appearance is critical to their operation.
**Contrast**
When using a Custom color scheme, this numerical control adjusts the overall contrast of the UI.
**Reset**
This resets any changes made to a Custom color scheme back to the default values.
**UI Transitions**
When switching between the three sections of Live FX -- the Start-up Screen, the Construct, and the Player -- the interface cross-fades to the new section rather than just changing instantly. This makes the transition smoother on the eyes. Disabling this button turns off the fade effect and the interface switches instantaneously to the new section.
**UI Animations**
This toggle activates the auto-panning mode for the Construct. When this is active, you can click, drag, and release and the Construct will continue to pan as if it has momentum from the ‘push’ you’ve given it. The Construct continues to coast along until you click on the interface or until the beginning or end of the Construct is reached.
**Square/Circular Menu**
These options control the appearance of the Live FX Command Menu. The Command Menu is a floating, pop-up menu that allows you to navigate between the various menus in the Live FX Player. See Chapter 5 – The Player for more details on the Command Menu.
**Slot Mirror Effect**
This set the amount of mirror effect on shots at the bottom of the slots in a Construct.
***
## Control Gearing

The next section of the User Menu determines how the Control Gearing behaves in Normal Mode and Shift Mode. These two values determine the sensitivity of the Control Gearing throughout the UI.
**Normal**
This sets the default increment for all Control Gearing. The value is expressed in terms of a relative percentage.
**Shift**
This sets the increment for any Control Gearing that is done with the Quick Key: Shift depressed.
Tip: If you want the Quick Key: Shift to decrease sensitivity rather than increase it, you can do so by inverting the two values. The Shift value should be less than the Normal value.
**Drag Threshold**
This is the time required to hold the mouse button down before a drag action is started as opposed to a regular click action.
**Swipe Sensitivity**
Set the sensitivity for swipe gestures to toggle UI elements on/off. The sensitivity is the speed with which you swipe the cursor to the edge of the UI to invoke the action. Lower sensitivity means that a higher speed is required. '**Off**' means that swiping is not available anymore.
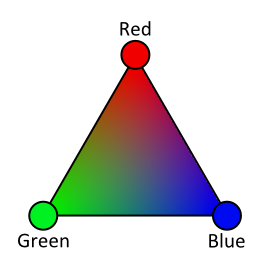
**Vector Mode**
This specifies the orientation of the Tracker Balls in the COLOR MODULE.\
\
Normally the order is:
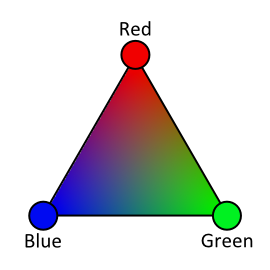
When Using Vector Mode, this becomes:\
\
**Angle**
This control enables you to change the *angle* of the orientation of the Tracker Balls.
***
## Preferences

**Proxy size**
This setting determines the default size of the proxy images representing the source media in a project. The final proxy image size is related to the resolution of the footage, this setting only sets a base level; small, medium, or large.
**Color Format**
This pull-down changes how color ranges are expressed within Live FX.The actual bit depth is not changed; it simply alters the value ranges that are displayed within the interface.
* 8-bit values range from 0 to 255
* 10-bit values range from 0 to 1023
* 16-bit values range from 0 to 65535
* 0.0-1.0 values range from 0.0 to 1.0
**No Bottom Swipe**
Enabling this setting will disable the cursor bottom swipe function which hides the menu panel and switches the shot being played to full-screen mode. This way you can prevent any accidental resizing of the Player. You will still be able to switch to full-screen mode by using the quick keys, and once in full-screen mode, the bottom swipe of the cursor will work to bring back the menu panel again.
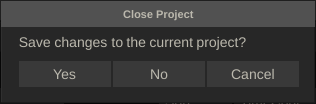
**Save**
There are two options for saving: Automatic and Manual. When set to Automatic, Live FX automatically saves all changes made whenever navigating between different Constructs, moving between a Construct and the Player (or vice versa), and when exiting a Project.
Both when set to Automatic or Manual, you can manually initiate a save at any time by using the Save All button or the Quick Key: Ctrl S.
When set to Manual, Live FX will ask if changes should be saved or not when exiting a Project by displaying a dialog panel:\
\
\
**Audio Set Sync**
When playing back footage, Live FX automatically switches the Sync Mode of the Player to the most logical option, based on the system configuration. For example, if SDI output is present, the Player defaults to using VIDEO as the Sync Mode. There may be times when this automatic selection is not what is desired.
This option forces the Player’s Sync Mode to Audio when you start playback, rather than automatically switching Sync Modes. This is useful for ensuring that playback always remains in sync with your audio. See Chapter 5 – The Player for more details on the Player’s Sync Modes.
**Tooltips**
Enable / Disable the display of Tooltips.
**Allow Delete Shot**
Normally, you cannot delete source media from within Live FX. The Delete Media button in the Construct only deletes media that has been generated by Live FX, such as cache files. This is done as a precaution so that users can trust that no matter what, their original source media will remain intact.
However, there are some instances where being able to delete source media from within Live FX could be useful. Enabling **Allow Delete Shot** replaces the normal BIN MEDIA button with BIN MEDIA & REF. This allows you to delete not only media that Live FX has created but also the original reference (source) media.
Note: Because the ALLOW BIN SHOT option is so potentially destructive, it is not persistent between sessions. Once you exit from a Project, you must go to the User Settings Menu and enable ALLOW BIN SHOT again if you want to use it when entering another Project.
***
## Snap Shot Settings

**Destination Folder**
This Text Slate determines where Snapshots are stored on the filesystem. By default, the path is set to the current Project’s folder and a sub-folder called SnapShot. An absolute path can be specified using the SET button.
**Format**
This chooses between JPEG and TIFF image formats for the resulting Snapshots.
***
## Sync User Profile
Through this panel, you can synchronize your local user settings, custom panel mappings, and gallery grades with your online account.
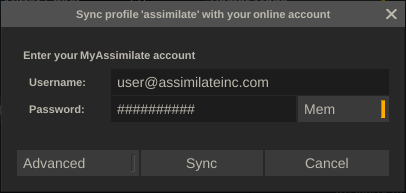
Click the **Sync** button to start the synchronization process. Make sure you entered the credentials for your online User Account. Use the **Mem** option to let Live FX store the credentials for future sync actions.
**ADVANCED**

The **Advanced** option shows additional options for the synchronization process.
**Slave Mode**
When enabled the Sync process will only download items to the local profile but not upload any (new) items to the online version.
**Clear Local Settings**
Remove all local gallery items. The online version remains untouched.
####
---
# Agent Instructions
This documentation is published with GitBook. GitBook is the documentation platform designed so that both humans and AI agents can read, navigate, and reason over technical content effectively. Learn more at gitbook.com.
## Querying This Documentation
If you need additional information that is not directly available in this page, you can query the documentation dynamically by asking a question.
Perform an HTTP GET request on the current page URL with the `ask` query parameter, and the optional `goal` query parameter:
```
GET https://assimilate.gitbook.io/live-fx-documentation/getting-started/introduction/settings/user-settings.md?ask=
In the **Account** section below the Profile, you can link the Profile with an online Account. Use the **Sync** button to open the Sync Profile dialog for selecting an online account and synchronizing it with the local settings. The Sync Profile dialog is discussed later in this paragraph. The **Clear** button will unlink the User Profile and the User Account.
Use the **Remove Profile** button in the lower left corner to delete a User Profile from the local system. This will not affect the linked online account. Note that you can *not* rename an existing User Profile. In that case, just create a new profile and delete the original.
***
## Appearance Settings

**Scheme**
There are three options in the pull-down menu for Scheme:
* Color
* Mono
* Custom
These select the overall color scheme for the UI. Color applies the default color scheme for the UI. Mono changes the UI color scheme to a monochromatic style which creates less intrusion on the eyes while doing color work. Custom allows you to customize the color of individual elements of the UI and modify the overall text size and font for the UI. This is covered in detail in Chapter 11 – Customization.
**Color Cursor**
This toggle switches the cursor between the standard color style and a monochrome style. This is also useful for minimizing the intrusion on the eyes while doing color work.
Note: Warning and confirmation dialogs still appear in color. Also, other specialized interface elements are not monochromatic since their color appearance is critical to their operation.
**Contrast**
When using a Custom color scheme, this numerical control adjusts the overall contrast of the UI.
**Reset**
This resets any changes made to a Custom color scheme back to the default values.
**UI Transitions**
When switching between the three sections of Live FX -- the Start-up Screen, the Construct, and the Player -- the interface cross-fades to the new section rather than just changing instantly. This makes the transition smoother on the eyes. Disabling this button turns off the fade effect and the interface switches instantaneously to the new section.
**UI Animations**
This toggle activates the auto-panning mode for the Construct. When this is active, you can click, drag, and release and the Construct will continue to pan as if it has momentum from the ‘push’ you’ve given it. The Construct continues to coast along until you click on the interface or until the beginning or end of the Construct is reached.
**Square/Circular Menu**
These options control the appearance of the Live FX Command Menu. The Command Menu is a floating, pop-up menu that allows you to navigate between the various menus in the Live FX Player. See Chapter 5 – The Player for more details on the Command Menu.
**Slot Mirror Effect**
This set the amount of mirror effect on shots at the bottom of the slots in a Construct.
***
## Control Gearing

The next section of the User Menu determines how the Control Gearing behaves in Normal Mode and Shift Mode. These two values determine the sensitivity of the Control Gearing throughout the UI.
**Normal**
This sets the default increment for all Control Gearing. The value is expressed in terms of a relative percentage.
**Shift**
This sets the increment for any Control Gearing that is done with the Quick Key: Shift depressed.
Tip: If you want the Quick Key: Shift to decrease sensitivity rather than increase it, you can do so by inverting the two values. The Shift value should be less than the Normal value.
**Drag Threshold**
This is the time required to hold the mouse button down before a drag action is started as opposed to a regular click action.
**Swipe Sensitivity**
Set the sensitivity for swipe gestures to toggle UI elements on/off. The sensitivity is the speed with which you swipe the cursor to the edge of the UI to invoke the action. Lower sensitivity means that a higher speed is required. '**Off**' means that swiping is not available anymore.
**Vector Mode**
This specifies the orientation of the Tracker Balls in the COLOR MODULE.\
\
Normally the order is:

When Using Vector Mode, this becomes:\
\

**Angle**
This control enables you to change the *angle* of the orientation of the Tracker Balls.
***
## Preferences

**Proxy size**
This setting determines the default size of the proxy images representing the source media in a project. The final proxy image size is related to the resolution of the footage, this setting only sets a base level; small, medium, or large.
**Color Format**
This pull-down changes how color ranges are expressed within Live FX.The actual bit depth is not changed; it simply alters the value ranges that are displayed within the interface.
* 8-bit values range from 0 to 255
* 10-bit values range from 0 to 1023
* 16-bit values range from 0 to 65535
* 0.0-1.0 values range from 0.0 to 1.0
**No Bottom Swipe**
Enabling this setting will disable the cursor bottom swipe function which hides the menu panel and switches the shot being played to full-screen mode. This way you can prevent any accidental resizing of the Player. You will still be able to switch to full-screen mode by using the quick keys, and once in full-screen mode, the bottom swipe of the cursor will work to bring back the menu panel again.
**Save**
There are two options for saving: Automatic and Manual. When set to Automatic, Live FX automatically saves all changes made whenever navigating between different Constructs, moving between a Construct and the Player (or vice versa), and when exiting a Project.
Both when set to Automatic or Manual, you can manually initiate a save at any time by using the Save All button or the Quick Key: Ctrl S.
When set to Manual, Live FX will ask if changes should be saved or not when exiting a Project by displaying a dialog panel:\
\
\

**Audio Set Sync**
When playing back footage, Live FX automatically switches the Sync Mode of the Player to the most logical option, based on the system configuration. For example, if SDI output is present, the Player defaults to using VIDEO as the Sync Mode. There may be times when this automatic selection is not what is desired.
This option forces the Player’s Sync Mode to Audio when you start playback, rather than automatically switching Sync Modes. This is useful for ensuring that playback always remains in sync with your audio. See Chapter 5 – The Player for more details on the Player’s Sync Modes.
**Tooltips**
Enable / Disable the display of Tooltips.
**Allow Delete Shot**
Normally, you cannot delete source media from within Live FX. The Delete Media button in the Construct only deletes media that has been generated by Live FX, such as cache files. This is done as a precaution so that users can trust that no matter what, their original source media will remain intact.
However, there are some instances where being able to delete source media from within Live FX could be useful. Enabling **Allow Delete Shot** replaces the normal BIN MEDIA button with BIN MEDIA & REF. This allows you to delete not only media that Live FX has created but also the original reference (source) media.
Note: Because the ALLOW BIN SHOT option is so potentially destructive, it is not persistent between sessions. Once you exit from a Project, you must go to the User Settings Menu and enable ALLOW BIN SHOT again if you want to use it when entering another Project.
***
## Snap Shot Settings

**Destination Folder**
This Text Slate determines where Snapshots are stored on the filesystem. By default, the path is set to the current Project’s folder and a sub-folder called SnapShot. An absolute path can be specified using the SET button.
**Format**
This chooses between JPEG and TIFF image formats for the resulting Snapshots.
***
## Sync User Profile
Through this panel, you can synchronize your local user settings, custom panel mappings, and gallery grades with your online account.

Click the **Sync** button to start the synchronization process. Make sure you entered the credentials for your online User Account. Use the **Mem** option to let Live FX store the credentials for future sync actions.
**ADVANCED**

The **Advanced** option shows additional options for the synchronization process.
**Slave Mode**
When enabled the Sync process will only download items to the local profile but not upload any (new) items to the online version.
**Clear Local Settings**
Remove all local gallery items. The online version remains untouched.
####
---
# Agent Instructions
This documentation is published with GitBook. GitBook is the documentation platform designed so that both humans and AI agents can read, navigate, and reason over technical content effectively. Learn more at gitbook.com.
## Querying This Documentation
If you need additional information that is not directly available in this page, you can query the documentation dynamically by asking a question.
Perform an HTTP GET request on the current page URL with the `ask` query parameter, and the optional `goal` query parameter:
```
GET https://assimilate.gitbook.io/live-fx-documentation/getting-started/introduction/settings/user-settings.md?ask=