# Custom Commands
## GENERAL
In the Preferences dialog in the Custom Commands tab, you can define Custom Commands. There are different types of Custom Commands:
* Define a button in Live FX to start an external script or application or open a web page.
* Define a button to initiate plug-ins.
* Define a button to start an XSL Transform.
* Define a Post Render command to run an external script or application after a render of an output node completes.
* Define a System Event command to run an external script or application after an event in the application: Start Application, Stop Application, Select User, Create-, Open- and Close-Project.
* Define a plug-in to be used on the reference monitor only.
The first three types of Custom Command buttons are placed in the Tools menu of the Construct and the Settings menu in the Player. Note that there is limited space to show buttons. Post Render commands are available with any output node in the Post Render tab in the Output menu in the Construct. Custom Commands that are initializing plug-ins for the second monitor are listed in the Dual Head section in the Settings-Monitor menu of the Player.
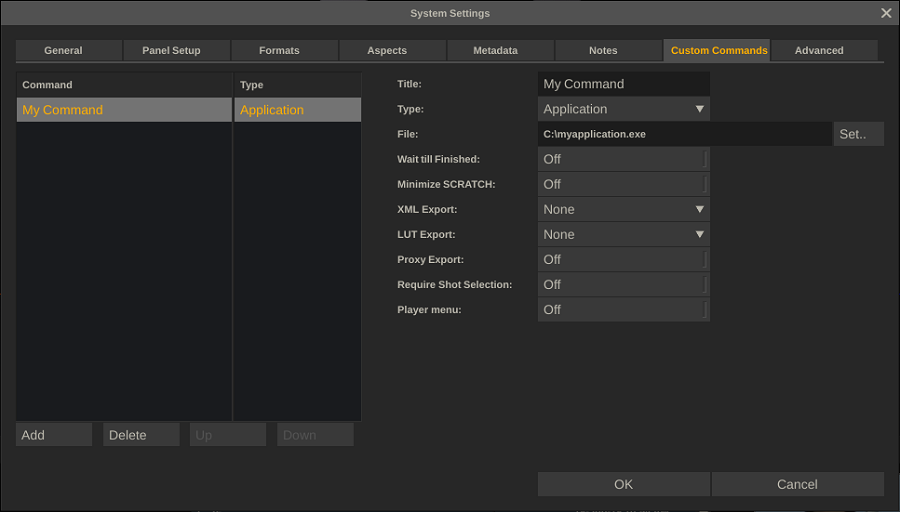
**Title**
The label that is displayed on the command button or in the post-render option list with any output node.
**Type**
Select the type of Custom Command. Depending on the type additional options are available.
## APPLICATION / SCRIPT
### **File**
The Path and Filename to the application or script to execute.
### **Wait Till Finished**
If enabled Live FX will return control over the User Interface only after the application or script closes. With this option enabled it becomes possible to import xml into the current project to update it. When enabled, Live FX will include a second command line parameter to the application/script with the location and filename where the application/script should write the xml to import into Live FX.
Note that you should be careful to use this option with applications/scripts that run for a considerable amount of time as it might appear to the user that Live FX has become unresponsive and is hanging.
### **Minimize** Live FX
When enabled Live FX will minimize itself before running the application or script.
### **XML Export**
Options to make Live FX export project XML data before executing the application/script. The path and filename of the exported XML are passed as a command line parameter to the application/script. The following options are available:
* None - no xml is created.
* Project - the full project xml is written.
* Group - only the current selected group is included.
* Construct - only the current selected Construct is included.
* Selection - only the currently selected shots are included.
By default any xml is stored in the temp folder of the current project folder; C:\ProgramData\Assimilator\Projects\MyProject\temp\ (PC), Library/Application Support/Assimilator/Projects/MyProject/temp/ (OSX). But as mentioned, the location is also passed to the application/script as a command line parameter. The structure of the XML is discussed in detail in Appendix B - Database, XML, XSLT, and HTML.
### **LUT Export**
Option to store the grade of the shots included in the XML in the form of a LUT: 1D, 3D or XML LUT.
### **Proxy Export**
Option to store a proxy image of each shot included in the XML as a jpeg file.
### Require Shot Selection
If set, the command button will be greyed out if no shot is selected in the Construct. This way you can force a selection before executing a script.
## Plugins
### **Plugin**
Select a specific Plug-in
### **Preset**
Select a plug-in preset file. Please see Chapter 7 - The Matrix for details on saving plug/in preset files.
### **Use on Dual Head**
Enabling this option will add the entry to the Dual Head Effects list as described in Chapter 5 - The Player, the Monitor Settings paragraph, rather than adding a command button.
### **Enter Player**
With this option enabled Live FX will after creating the plug-in automatically open the node in the Player.
## POST RENDER
The Post Render - custom command type has similar parameters as the Application/Script type. Also, similar to the Application custom command, the Post Render command is passed (as command line parameter) a file reference to an XML file with details on the render. Also, the actual XML is also stored in the temp folder with a project. The structure of the the XML of a render is discussed in detail in Appendix B - Database, XML, XSLT and HTML.
Also note that even though the external script / application has access to the rendered files - these might be in use and as such it can not freely move or rename them (this applies to most container formats (MXF, Quicktime, etc.). In general is is not advisable to try to move or rename rendered files in this way as Live FX would still try and maintain a link to the rendered files. Rather you should make a copy if needed.
## SYSTEM EVENT
The System Even - custom command type has similar parameters as the Application/Script type. Also, similar to the Application custom command, the System Event command is passed (as command line parameter) a file reference to an XML file with details on the render. Also, the actual XML is also stored in the temp folder with a project. The structure of the the XML of a render is discussed in detail in Appendix B - Database, XML, XSLT and HTML.
There are currently 6 system Events that can be used to trigger an external script. Each of the events will pass along different information (xml) to the external script.
* Start Application: passes the Live FX application data folder.
* Stop Application: passes the Live FX application data folder.
* Select User: passes the selected User data folder. This event is also always fired once on startup.
* New Project: passes the newly created project folder. Only fired when manually creating a new project.
* Open Project: passes project xml.
* Close Project: passes project xml.
## XSL TRANSFORM
### **File**
The full path and filename of the XSLT script.
### **Export Type**
The extension for the result file of the XSL Transformation.
## WEBPAGE
### **URL**
The full web address, including the http\:// protocol prefix. Rather than creating an xml file with information on the current selection -the URL is extended with the following fields:\
\
SCRATCH\_WATCH\_FOLDER - if set the system watch-folder.\
SCRATCH\_PROJECT\_FOLDER - the project folder of the current project.\
SCRATCH\_MEDIA\_FOLDER - the default media folder of the current project.\
SCRATCH\_RENDER\_FOLDER - the default render folder of the current project.\
SCRATCH\_EXPORT\_FOLDER - if set the auto-export folder for the project.\
SCRATCH\_PROJECT - the name of the current project.\
SCRATCH\_GROUP - the name of the current selected group.\
SCRATCH\_CONSTRUCT - the name of the current selected Construct.\
\
If a shot is selected:\
\
SCRATCH\_SLOTNAME - the name of the slot selected shot resides.\
SCRATCH\_SLOTNR - the index of the slot in the selected shot resides.\
SCRATCH\_SHOT\_UUID - the unique identifier of the shot.\
SCRATCH\_SHOT\_FILENAME - the filename (of the first frame) of the shot.\
SCRATCH\_SHOT\_IN - the in-point as set by the user.\
SCRATCH\_SHOT\_OUT - the length of the shot.\
SCRATCH\_SHOT\_CURRENT - the current frame of the selected shot.\
\
The fields are added as parameters in this format:\
\
.......
---
# Agent Instructions: Querying This Documentation
If you need additional information that is not directly available in this page, you can query the documentation dynamically by asking a question.
Perform an HTTP GET request on the current page URL with the `ask` query parameter:
```
GET https://assimilate.gitbook.io/live-fx-documentation/getting-started/introduction/settings/system-settings/custom-commands.md?ask=
```
The question should be specific, self-contained, and written in natural language.
The response will contain a direct answer to the question and relevant excerpts and sources from the documentation.
Use this mechanism when the answer is not explicitly present in the current page, you need clarification or additional context, or you want to retrieve related documentation sections.