# Project Settings
Selecting the **New** or **Project Settings** buttons from the Startup Screen opens the Project Settings dialog.
#### PROJECT SETTINGS DIALOG
Most settings for a Live FX project act more as defaults rather than strict settings. E.g. projects are not locked to a single resolution or frame rate; a single Project can contain multiple Timelines with different resolutions and frame rates.
The actual project setting merely reflects the default framerate for a new timeline that you create within your project, which you can subsequently change at any time.
Also note that any changes you enter into this panel take effect immediately, not just after pressing the OK button. Except for the project Name: any changes to that need to be explicitly confirmed.
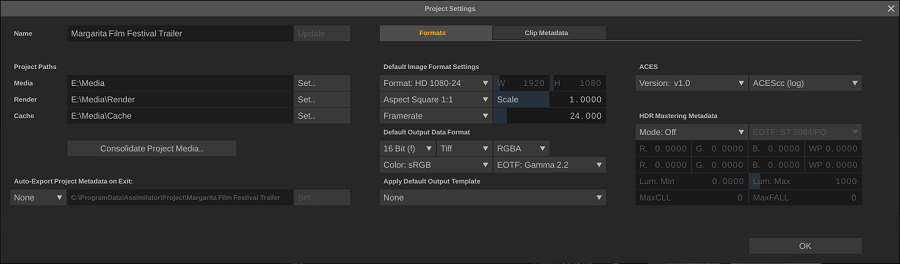
**PROJECT NAME**
Click in this Text Slate to enter a name for a new project or change the name of the currently selected Project. If you are creating a new project you will first have to select the **Create** button next to the text slate before you can enter additional project settings. If you are updating the name of an existing project you need to select the **Update** button to apply the name change.
**PROJECT PATHS**
**Media Folder**
The Media folder defines the root location that Live FX uses for resolving the path to source clips. Any clips loaded from a directory below this root have their location saved as a relative path from the Media folder. This method allows you to easily change the location if the media gets moved to a different drive or sub-folder. After changing the Media folder, Live FX will continue to link to the source clips. Use the **Set** button to browse for the Media Directory.
Note: You are *not* restricted to this Directory for loading clips! A clip may be loaded from anywhere. However, clips that are loaded from outside the Media folder have their ABSOLUTE path saved. If this absolute path changes, Live FX is not able to re-link to those source clips automatically. As a result, it’s a good practice to ensure that all media for a particular Project is contained inside the Media folder.
By default, the media folder for the first project you create is set to the default video folder of your system. The default for any projects created after that is based on the prior media folder you used, extended with the name of a new project. Note that you can turn off this automatic assignment of a project media folder in the Advanced System Settings.
Note that the project media-, render- and cache folders are not stored in the project database. This means that if you copy a project database to another system you will need to re-assign the project folder again.
**Render Folder**
The Render folder defines the default root location for rendering output from the current project. However, you can change the output path for any output in your project at any time. This folder is just the default and again acts as a virtual root for all output rendered to a location within this folder.
Note: The Render Directory is set by default to the ../render/ sub folder in the Media directory.\
\
Tip: In many cases, it might be more efficient to set the output to a different (physical drive) location than the media directory so that read and write operations do not interfere.
**Cache Folder**
The Cache folder defines the root location for rendering temporary output when working with the current project: e.g. processing effect plug-in output, and media to be published.
Note: The Cache Directory is set by default to the ../cache/ sub folder in the Media directory.
**CONSOLIDATE**
This opens the project Consolidate dialog - discussed in detail later in this chapter.
*Note:* Because the Consolidate function has potentially far-reaching consequences for projects and stored media, you can hide this option from the menu setting the Disable Consolidate option in the Advanced System Settings (explained in the next paragraph).
**AUTO-EXPORT OPTIONS**
When setting the Auto-Export option, Live FX will on every project exit or project refresh export project data from the project database to an external file which can be used by third-party applications. In case the export is set to HTML, Live FX will ask before doing the export as this might potentially be a lengthy procedure. The exported data contains information about the content and setup of the Project and can be used by third-party systems for informational purposes or integration into a broader pipeline.\
\
Project data can either be exported as XML or HTML. To generate HTML Live FX generates XML first and uses that in a (customizable) XSL transformation. In this process, Live FX will also create a proxy image file for each shot in the project. When selecting HTML as an export format, two additional options become available. The Overwrite option is enabled by default, meaning that on every export the proxy image of every shot is re-created. Disabling the option will only create an image proxy when no image file for the shot is present yet in the designated location. This will speed up the export process but does not ensure that the image is the most recent available. The second option available for the HTML export is to create a LUT per shot in the project. This LUT can be used in third-party systems. The LUT can either be 1D or 3D. The 3D LUT has by default size of 32 and a depth of 16. The creation of the LUT is also linked to the Overwrite option.
When enabling Auto-Export the export is placed in the directory specified in the Text Slate. Use the **Set** button to browse for the Export Directory. For more information about the XML / HTML output and Live FX XML in general, refer to Appendix B of this guide.
**FORMAT**
Format defines the default resolution, frame rate, and aspect ratio for each new Construct that is created in the Project. Clicking on the FORMAT button opens a pull-down menu with preset formats. Choose any of these formats and the resolution, frame rate, and aspect ratio information is automatically updated.
There is also a CUSTOM format that allows you to define each parameter independently. Once CUSTOM is selected, the Width and Height Numerical Slates will be active.
Note: The maximum size for a Construct is 65535 pixels by 65535 pixels and the minimum size is 32 pixels by 32 pixels.
Tip: You can define your custom image formats that appear in the pull-down menu by editing the ImageFormats.cfg file. See Chapter – Customization for more information.
**ASPECT**
The Aspect Ratio is defined in Live FX with two controls: Aspect and Scale.
Aspect defines the overall relationship of height to width in the image, while Scale defines the aspect ratio of each pixel within the image.
Certain formats such as NTSC and PAL do not have square pixels. They are rectangular. This difference must be taken into account so that images are presented without distortion on the screen.
Clicking on the ASPECT button opens a pull-down menu with preset aspect ratios that can be selected. These presets automatically set the SCALE value accordingly.
There is also a CUSTOM aspect that allows you to set the pixel ratio manually.
Note: The Aspect Ratio (and thereby the Scale) is set as part of the FORMAT presets. Changing the FORMAT automatically changes the Aspect to the setting that is linked to that particular format. You can manually change the Scale afterward by selecting the CUSTOM Aspect from the pull-down and entering a new value into the Scale Numerical Slate.
Tip: You can define your custom aspect ratios that will appear in the pull-down menu by editing the Aspects.cfg file. See Chapter – Customization for more information.
**FRAMERATE**
The default frame rate for the Project can be set in two ways.
You can click on the FRAMERATE button for a pull-down menu with standard frame rate options from 23.976 to 60. Or, you can enter a framerate using the adjacent Numerical Slate.
Note: The framerate of the Project controls what values will be assigned to information such as Timecode, and how EDLs will be interpreted. It is important that this value be set correctly before any import or conform operations are performed.
**DEFAULT OUTPUT FORMAT**
Select the default bit-depth, file format, color channel setup, color space, and gamma transfer function (eotf) for each output that you create in the Project. Similar to resolution and framerate - the values set here are just default. The actual value of a node inside a project can be changed at any time.
**DEFAULT OUTPUT TEMPLATE**
A timeline / Construct in a Live FX project can have multiple interdependent outputs defined with it: different resolutions and formats all defined in a single output tree. You can store such a tree in a template file. This setting allows you to select such a template file which in turn will automatically have the defined output tree with each new timeline / Construct you create within your project. This can save you time re-creating all your outputs manually every time.
**ACES SETTINGS**
This section of the Project Settings determines how Live FX handles clips that are flagged as ACES colorspace. First, you set the ACES Version to be used. ACES contains a series of CTL transformation scripts, published by the Academy. The scripts are used to convert images from and to various well-known color spaces (Rec709, sRGB, etc) and ACES. Over time the Academy has issued different versions of these scripts/transformations and most likely will issue new versions in the future. Here you determine with which version of the scripts you want to work in your project. That way, if a new version is issued, the old projects are not affected. Please also read Chapter - Customization, paragraph 8 about ACES - where the various scripts are located and options to customize the scripts if needed.
Next to the ACES version, you can also set an ACES mode: linear or one of the log modes. The **ACES log** mode determines if Live FX should by default convert a shot that has been flagged as ACES to ACES Log. By converting an ACES clip to ACES Log, the various color tools will give you a different response than when leaving the shot in its ACES linear state. Note that this option is a default and that if needed you can change this setting on a per-shot basis from inside the project: see Chapter - ColorFX. For more information on the difference between ACEScc and ACEScct, please visit the ACES Academy website at .
**HDR MASTERING METADATA**
There you define the defaults for your HDR outputs. All the metadata is included in the (HDMI) video output signal to your reference monitor. All the static metadata (colorspace, transfer function, and luminance levels) are also included in your HDR output: either as past of the media itself or as an external report that you can create. Furthermore, the max Luminance level is included as a reference in the Waveform monitor in the Scopes in the Player.
For any of the standard colorspaces, the primaries (RGB) and White Points are fixed. Selecting the Custom option allows you to fill in the primaries and white point yourself. Live FX can process three Electro-Optical-Transfer-Funcitons (EOTF): standard SDR, PQ (ST), and HLG.
For more information on HDR, see Chapter 4 - the Construct in the paragraph on Outputs.
**CLIP METADATA**
This section allows you to define a set of custom metadata items that are attached to all shots that you load into the project.
**Add**
Add a new clip default metadata item. Enter a proper name into the Metadata text slate and a value into the corresponding text slate below that. To generate dynamic values use one of the more available #codes from the **Fx** option button. Selecting an item from the drop-down will insert the #code at the current insert position of the value text slate.
The available #codes in Live FX are listed in the Chapter - Customize.
**Remove**
Remote the selected Default Metadata item from the list
**Set as Default**
Store the current list of Default Metadata items to be the starting list for newly created projects.
#### CONSOLIDATE
The Project Consolidate function allows you to move all used physical media to a new media folder and/or to just move any media external to the media folder into the project's media folder.\
\
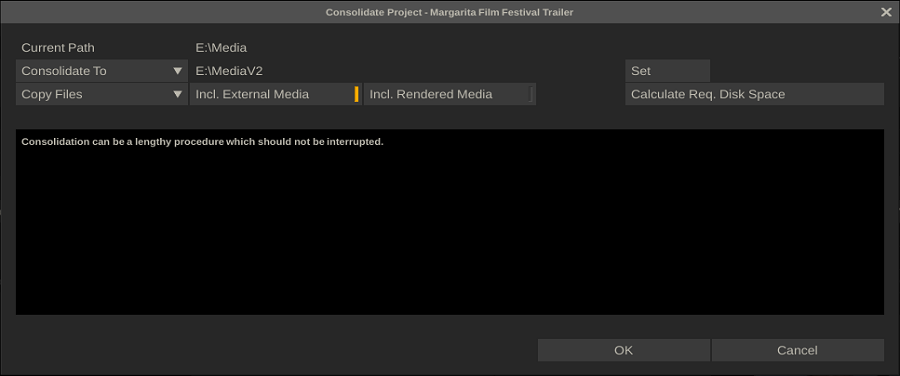
**CURRENT PATH**
At the top of the dialog, the current Project Media path is displayed
**CONSOLIDATE TYPE**
There are two types of consolidation:
**Consolidate To**
With this option, a new Project Media folder is created and all media used in the project is moved to the new folder.
**Make Local**
This option scans all the media used in the project and moves all items that are stored outside the Projects Media folder into that folder.
**COPY / MOVE**
The consolidate can either make a copy of each consolidated media file or just move the file to the consolidate folder. Moving files will in general be much faster, however only possible when source and destination are on the same logical drive - if not, Live FX will automatically make a copy even if the Move option is selected.
**INCL. EXTERNAL MEDIA**
This option is only available with the **Consolidate To** type of consolidate. Enabling this option will also move any media outside the current media folder to the new media folder. Without this option, any external media is not included in the consolidate. When moving external media into the media folder the full path is used within the media path:e:\external\media\shot.mov will move to d:\new\_media\_path\external\media\shot.mov.
**INCL. RENDERED MEDIA**
This option is only available with the **Consolidate To** type of consolidate. Enabling this option will also move any rendered media to the new media folder. Disabling this option will exclude any rendered media; all output nodes in the project will lose their reference to the rendered media and need to be processed again.
**CALCULATE REQUIRED DISK SPACE**
This button will calculate and show the required disk space, given the consolidate type and selected options, and the free disk space available; either of the disk of the new media folder or that of the current folder if the Make Local option is selected. This check is *always* performed before starting a consolidate. If Live FX detects that the target disk does not have enough disk space available, the consolidate will not start.
**EXECUTING THE CONSOLIDATE**
The Start button will begin the Consolidate process. About the Consolidate process:
* The first step is confirming that there is enough disk space to execute the consolidate. If Live FX detects insufficient disk space, the consolidate will not proceed.
* Next to writing the beginning and end of the consolidate to the regular Live FX logs, a special consolidate.log file is created and written in the Project folder of the current project. This log lists every step of the process. The log file is never overwritten and maintains older consolidate listings unless manually removed.
* The Consolidate copies / moves all media of a shot and not just the part used inside Live FX; always the full sequence / all the file segments.
* The Consolidate process uses Live FX's own sequential copy method that ensures edits are optimized for real-time playback.
* The Consolidate process also includes audio files.
* The dialog calculates and displays the time remaining for the process to finish. This estimate is updated after each file move/copy.
**INTERRUPTING THE CONSOLIDATE**
A Consolidate process can be a very lengthy procedure which preferably should *not* be interrupted. It is possible though to pause the process by clicking the **Stop** button; the process will finish the current copy/move action. After pausing the process you can exit the Consolidate dialog but you will however *not* be able to enter the project that is being consolidated. Other projects are normally accessible.\
\
\
\
A Consolidate that was paused can be resumed at any time, even after exiting Live FX and starting it up again; the **Resume** button will start the process where it left off. To completely abort a consolidate process, press the **Abort** button:
* Live FX will ask for a confirmation to abort the consolidate as in potentially might result in losing media references. In addition, Live FX will ask whether to finish the consolidation for the current shot as to further minimize the chance of losing media references.
* Only after fully finishing the consolidate process the project's media folder setting is updated. Aborting a consolidate process will leave the old media folder referenced. When using the *Move* option rather than the *Copy* option, will make all the media processed til the abort external. If *Copy* was used, the copied media will not be referenced. This only applies to non-external media.
**CLOSE**
After finishing the consolidate the Close button will close the dialog and return to the Project settings menu.
**CONSOLIDATING PARTS OF A PROJECT**
The Consolidate process is always performed on the complete project. To consolidate only part of a project (e.g. a single Construct) you have to use the Construct Consolidate function inside the **Tools** menu of the corresponding Construct - see Chapter 04 - The Construct.
