Live FX Documentation
  • 📚Getting Started
    • Introduction
      • Feature Comparison
      • Download & Install
      • Settings
        • System Settings
          • Custom Commands
          • Advanced
        • User Settings
        • Video IO Settings
          • Black Magic Troubleshooting
      • Helpful Shortcuts
        • Construct Shortcuts
        • Player Shortcuts
        • Viewport Shortcuts
        • ColorFX Shortcuts
        • Stage Lights Shortcuts
    • The Basics
      • Project Settings
      • Change Shot Framerate and Resolution
      • Change the Shot Length
      • Timecode
      • Working with Layers
      • General Tips
    • Helpful Links
    • First Time Start-Up
    • User Interface
  • ⚡Quickstart Example Projects
    • Simple Video Playback
    • Green Screen with 360 Background
    • LED Wall - Projection Mapping
    • LED Wall - Without Projection Mapping
    • Packaged Unreal Engine project Example
  • 📼Video Playback
    • Video-IO Settings
    • Playback h.264 files
    • Import Media and Maintain Folder Structure
  • 🎥Camera Tracking
    • Camera and Lens Calibration
    • Camera Trackers
      • REtracker Bliss
      • ZEISS CinCraft Scenario
      • MoSys
      • Stype
      • OptiTrack
      • HTC Mars Camtrack
      • Free D
      • iPhone Apps
    • How to apply camera tracking to a layer, image, or mask
    • How to manually adjust camera tracking speed and delay
    • How to delay the Inner Frustum
    • How to apply FIZ (Zoom and Focus) from Camera Tracking
  • Motion Control
    • Mark Roberts Motion Control (MRMC)
    • Motorized Precision
    • eMotimo
    • SISU
  • 🟩Green Screen Workflow
    • Qualifiers
    • Green Screen with Set Extension Workflow
    • Working with Ultimatte
  • 📺LED Workflow
    • Setting up an LED Wall
      • Set Up Nvidia Mosaic
      • Nvidia Multi-GPU Configuration
    • Stage Manager
    • How to make the inner frustum green
    • Switcher Node
    • Tips when using Projection Mapping
    • Using HDR
    • Projection Mapping Tutorials
      • Part 1: General Introduction to Projection Mapping
      • Part 2: : Projection Mapping - Media Types & Projection Models
      • Part 3: Projection Mapping on multiple walls
      • Part 4: Projection Mapping with Unreal Engine
      • Part 5: Set Extensions
  • 💡Lighting
    • Getting started with Image Based Lighting
    • Lighting Brands
      • Aputure
      • Creamsource
      • Kino Flo
        • Mimik 120
        • Freestyle
      • Prolycht
      • Quasar Science
    • How to Sample Multiple Video Sources through Videowall
    • Rec2020 Example Project
      • Megapixel HELIOS settings for Mimik
      • Blackmagic UltraStudio 4k Mini Settings
      • Setup Display Colorspace
      • Video IO Settings
      • Create and Set up your Project
      • Create and set up your Shot
      • Fix Jitter
  • 🎮Unreal Engine
    • Known Issues with Live FX <> Unreal
    • Set up Unreal Engine with Live FX
    • Play your Unreal Engine scene as a Game
    • How to Package an Unreal Engine Project for Live FX
      • Command Line Arguments
      • Before You Package
    • Unreal Web Remote Control (Optional)
    • Control UE through OSC
    • Take Recorder
    • Working with Sequencer
    • Unreal Optimization
      • Console Commands / Command Line Arguments
      • List of all Console Variables and Commands
        • Scalability Groups Console Variables
        • Renderer Console Variables
      • Baking Light
      • DLSS
  • ©️Cuebric Workflow
    • Projection Mapping with Cuebric Files
    • Non-Projection Mapping with Cuebric
  • 🧊2.5d Workflow
    • Projection Mapping 2.5d Workflow
    • Non-Projection Mapping 2.5d Workflow
  • 🖥️Multi-Computer Workflows
    • Sync Players
    • Sync Projects across Multiple Nodes
  • 🌅Live Looks - Live Grade LED Walls
    • How to Purchase and Install Live Looks
    • How to set up Live Looks with Brompton
    • Live Grading with Live Looks
  • 🗃️Compositing
    • Working with the Alpha Channel
    • Re-Map EXR channels
    • Working with Mattes
    • Opacity and Blend Modes
  • 🆘General Troubleshooting
    • 📰Licensing the Software
    • 🕙Dealing with Delay
    • 🖥️Networking Tips
    • ❓Frequently Asked Questions (FAQs)
      • Does Live FX support Unreal 5.3?
      • Why won't Live FX open when I have a second monitor hooked up?
      • How do I switch the toolset from Live FX to Scratch?
      • Where is the record button?
      • Why is my image dark (or why are my colors wrong)?
      • How do I close Live FX?
      • How do I minimize Live FX?
      • What is SCRATCH? What is Assimilate? Are they the same thing as Live FX?
      • How do I change the mouse from moving in circles to left/right?
    • Stuttering Playback
  • 📘User Guide (Old)
Powered by GitBook
On this page
  • Overview
  • Create the shortcut
  • Customize the shortcut
  1. Unreal Engine

Play your Unreal Engine scene as a Game

PreviousSet up Unreal Engine with Live FXNextHow to Package an Unreal Engine Project for Live FX

Last updated 1 year ago

Overview

If you are using an LED workflow, you will want to run your Unreal Engine project as a game or

The main reason you need to do this is so that you can render the viewport offscreen, as Live FX will read the texture share and show it in the Live FX viewport.

Rendering offscreen has some performance benefits but even if your computer can handle the scene without rendering offscreen, other artifacts can show up on LED walls or second monitors by rendering the viewport twice, and if you didn't set your project settings to not "Use less CPU when in background", it may also go very slow.

The path to your Unreal Engine project should be short, if not you may run into issues where you cannot put in all the command line variables you need to. Keeping folder and file names short or moving your project somewhere with a short path is the best practice.

Create the shortcut

The first few times you do this process, it will seem confusing, but once you've done it a few times, it's not difficult.

Make sure you pay close attention to spelling, spaces, and quotation marks, it's easy to make a mistake in the written part of the text.

  1. Create a shortcut for Unreal Engine. It's default location is: C:\Program Files\Epic Games\UE_5.3\Engine\Binaries\Win64\UnrealEditor.exe You can create a shortcut here and move that shortcut wherever you want. 
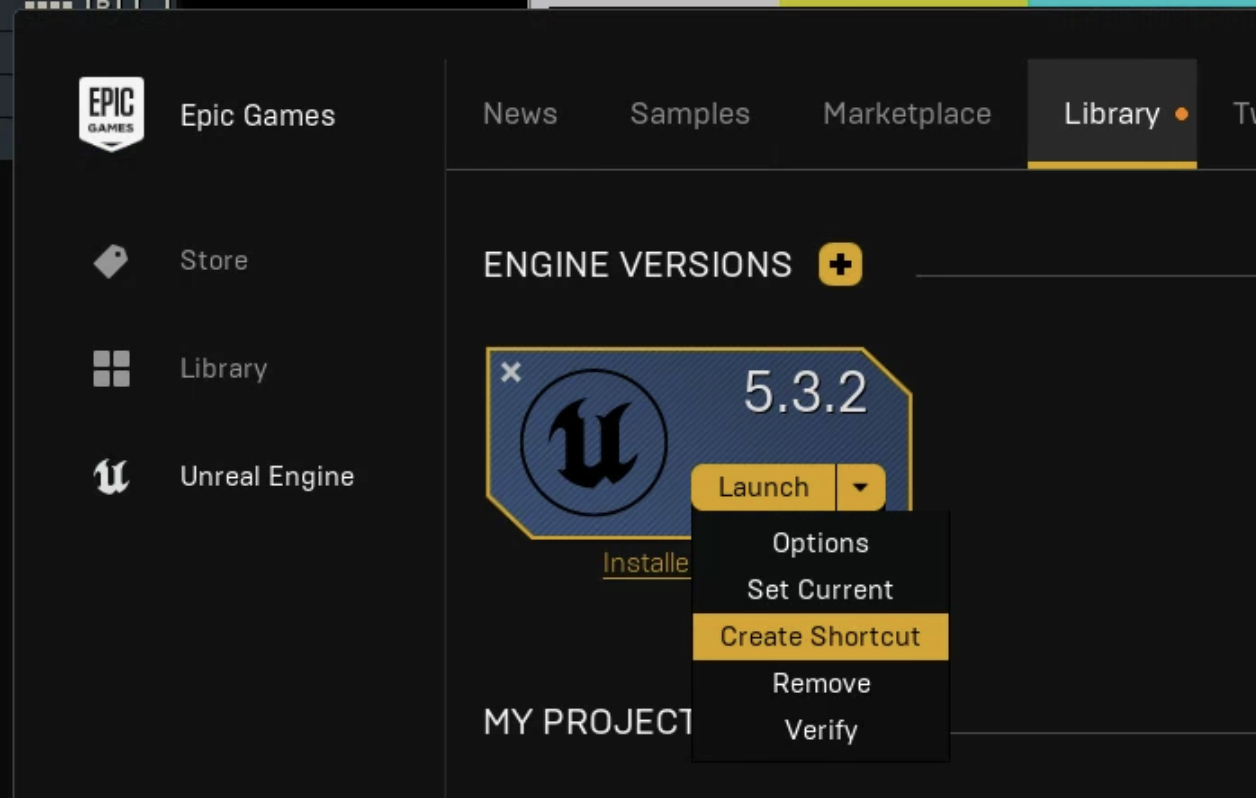
Another way to create the shortcut is to go to the Epic Games Launcher, click on the dropdown menu of the version of the engine you want to use, and select Create Shortcut, which will place a shortcut on your desktop.

Customize the shortcut

  1. Right-click on the shortcut and select Properties.

    The target field has the path to the Unreal Engine .exe

  2. Find the location of the project you want to open and copy the full path. There are different ways to do it, but one way is to copy the path at the top, then add the full project name including ".uproject".

  3. In the target field of the shortcut, right after the .exe" add one space, one quotation mark then paste the Project location, followed by another quotation mark. In this example, this is how the full target line would read, with only one space between the engine path and the project path: "C:\Program Files\Epic Games\UE_5.3\Engine\Binaries\Win64\UnrealEditor.exe" "C:\Users\Demon\Documents\Unreal Projects\PackagingTests\PackagingTests.uproject"

-game -ForceRes -ResX=1920 -ResY=1080 -RCWebControlEnable -RCWebInterfaceEnable -t.maxfps = 23.976 -

After the last quotation marks you can put in whatever You will at the very least need to use the -game and you will likely want to specify the Resolution with the ForceRes flag.

🎮
Command Line flags that you'd like.
Package your project to a stand-alone .exe file.
Make sure there is one and only one space between the Engine Path and the Project Path