Live FX Documentation
  • 📚Getting Started
    • Introduction
      • Feature Comparison
      • Download & Install
      • Settings
        • System Settings
          • Custom Commands
          • Advanced
        • User Settings
        • Video IO Settings
          • Black Magic Troubleshooting
      • Helpful Shortcuts
        • Construct Shortcuts
        • Player Shortcuts
        • Viewport Shortcuts
        • ColorFX Shortcuts
        • Stage Lights Shortcuts
    • The Basics
      • Project Settings
      • Change Shot Framerate and Resolution
      • Change the Shot Length
      • Timecode
      • Working with Layers
      • General Tips
    • Helpful Links
    • First Time Start-Up
    • User Interface
  • ⚡Quickstart Example Projects
    • Simple Video Playback
    • Green Screen with 360 Background
    • LED Wall - Projection Mapping
    • LED Wall - Without Projection Mapping
    • Packaged Unreal Engine project Example
  • 📼Video Playback
    • Video-IO Settings
    • Playback h.264 files
    • Import Media and Maintain Folder Structure
  • 🎥Camera Tracking
    • Camera and Lens Calibration
    • Camera Trackers
      • REtracker Bliss
      • ZEISS CinCraft Scenario
      • MoSys
      • Stype
      • OptiTrack
      • HTC Mars Camtrack
      • Free D
      • iPhone Apps
    • How to apply camera tracking to a layer, image, or mask
    • How to manually adjust camera tracking speed and delay
    • How to delay the Inner Frustum
    • How to apply FIZ (Zoom and Focus) from Camera Tracking
  • Motion Control
    • Mark Roberts Motion Control (MRMC)
    • Motorized Precision
    • eMotimo
    • SISU
  • 🟩Green Screen Workflow
    • Qualifiers
    • Green Screen with Set Extension Workflow
    • Working with Ultimatte
  • 📺LED Workflow
    • Setting up an LED Wall
      • Set Up Nvidia Mosaic
      • Nvidia Multi-GPU Configuration
    • Stage Manager
    • How to make the inner frustum green
    • Switcher Node
    • Tips when using Projection Mapping
    • Using HDR
    • Projection Mapping Tutorials
      • Part 1: General Introduction to Projection Mapping
      • Part 2: : Projection Mapping - Media Types & Projection Models
      • Part 3: Projection Mapping on multiple walls
      • Part 4: Projection Mapping with Unreal Engine
      • Part 5: Set Extensions
  • 💡Lighting
    • Getting started with Image Based Lighting
    • Lighting Brands
      • Aputure
      • Creamsource
      • Kino Flo
        • Mimik 120
        • Freestyle
      • Prolycht
      • Quasar Science
    • How to Sample Multiple Video Sources through Videowall
    • Rec2020 Example Project
      • Megapixel HELIOS settings for Mimik
      • Blackmagic UltraStudio 4k Mini Settings
      • Setup Display Colorspace
      • Video IO Settings
      • Create and Set up your Project
      • Create and set up your Shot
      • Fix Jitter
  • 🎮Unreal Engine
    • Known Issues with Live FX <> Unreal
    • Set up Unreal Engine with Live FX
    • Play your Unreal Engine scene as a Game
    • How to Package an Unreal Engine Project for Live FX
      • Command Line Arguments
      • Before You Package
    • Unreal Web Remote Control (Optional)
    • Control UE through OSC
    • Take Recorder
    • Working with Sequencer
    • Unreal Optimization
      • Console Commands / Command Line Arguments
      • List of all Console Variables and Commands
        • Scalability Groups Console Variables
        • Renderer Console Variables
      • Baking Light
      • DLSS
  • ©️Cuebric Workflow
    • Projection Mapping with Cuebric Files
    • Non-Projection Mapping with Cuebric
  • 🧊2.5d Workflow
    • Projection Mapping 2.5d Workflow
    • Non-Projection Mapping 2.5d Workflow
  • 🖥️Multi-Computer Workflows
    • Sync Players
    • Sync Projects across Multiple Nodes
  • 🌅Live Looks - Live Grade LED Walls
    • How to Purchase and Install Live Looks
    • How to set up Live Looks with Brompton
    • Live Grading with Live Looks
  • 🗃️Compositing
    • Working with the Alpha Channel
    • Re-Map EXR channels
    • Working with Mattes
    • Opacity and Blend Modes
  • 🆘General Troubleshooting
    • 📰Licensing the Software
    • 🕙Dealing with Delay
    • 🖥️Networking Tips
    • ❓Frequently Asked Questions (FAQs)
      • Does Live FX support Unreal 5.3?
      • Why won't Live FX open when I have a second monitor hooked up?
      • How do I switch the toolset from Live FX to Scratch?
      • Where is the record button?
      • Why is my image dark (or why are my colors wrong)?
      • How do I close Live FX?
      • How do I minimize Live FX?
      • What is SCRATCH? What is Assimilate? Are they the same thing as Live FX?
      • How do I change the mouse from moving in circles to left/right?
    • Stuttering Playback
  • 📘User Guide (Old)
Powered by GitBook
On this page
  • Setup
  • Create the initial Project
  • Shared folder for the Media
  • Shared folder for Project.
  • Use FreeFileSync to push new changes
  1. Multi-Computer Workflows

Sync Projects across Multiple Nodes

PreviousSync PlayersNextLive Looks - Live Grade LED Walls

Last updated 9 months ago

Until we have a more streamlined workflow for Multi-Node workflows, you can use tools like Free File Sync to push new changes from your master machine to your client machines.

Some IT knowledge will go a long way in setting this up.

Setup

Before we get setup let's go over a few things.

If you have a shared media server, you should be able to use to add new media to your project. If not, you'll need to sync the media location local path that is the same for all machines.

This way, you can add media to each machine in the same folder and Live FX will know where to look for it. Also this way

Create the initial Project

First, let's create the initial project that we are going to sync. Let's first create it on the Master machine. I will create a project called "00_SharedProject" and use the default settings for now.

Now let's go to the client machine and create a project with the exact same name.

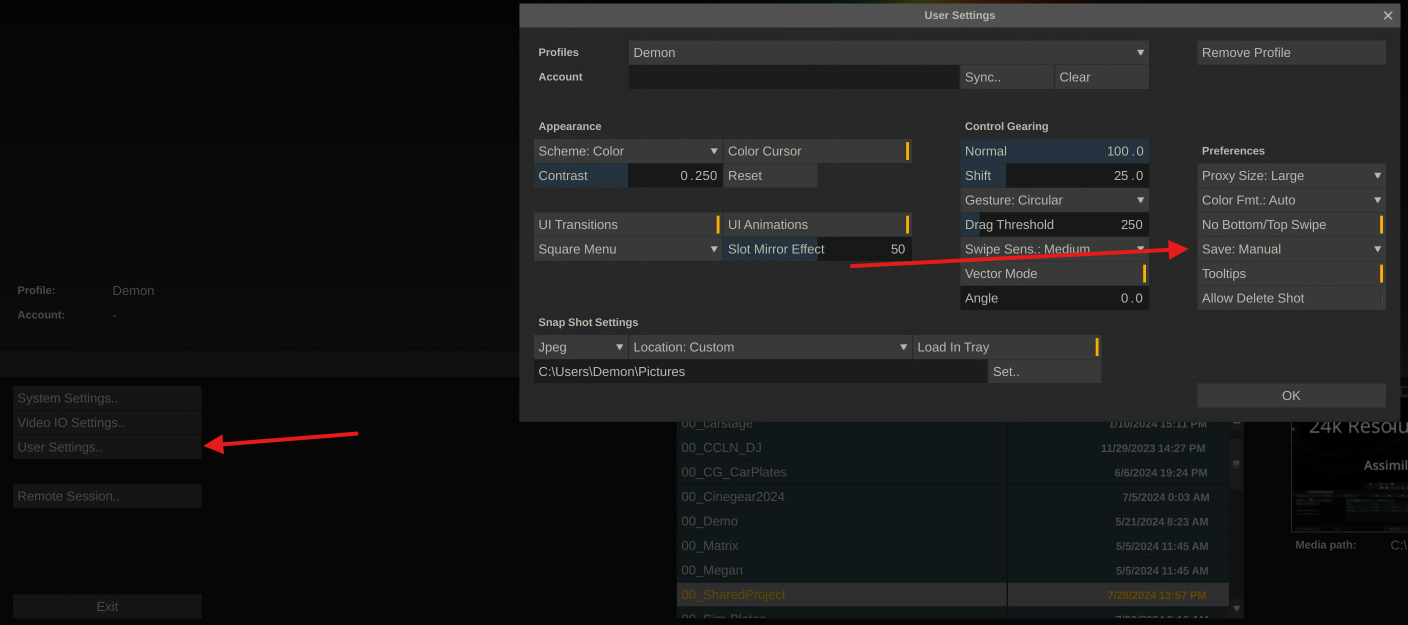
On the client machine(s), you will want to turn off auto-save. You can do this by going to the User Settings and under preferences, change Save to manual.

Shared folder for the Media

  1. Make sure your computers are on the same network and can ping each other.

  2. On the client machine, let's create a shared folder for wherever you are going to store your media. For now, I will do this in the same location as my project, but this can be anywhere you want to store the media. I will name this folder "Media". *it should be a fast nvme or ssd drive if you plan to playback high-resolution media.

  3. From the Live FX start menu, go to your project settings,

    Now change your Media Path to be the new folder you created.

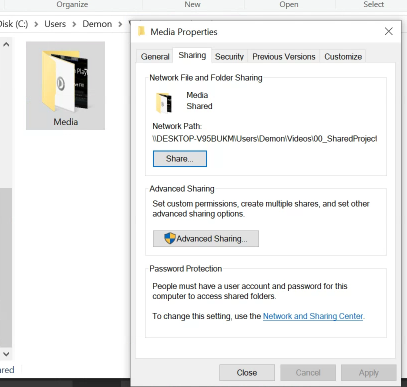
  4. In File Explorer, navigate to the Media folder, right-click the folder, go to Properties, then go to the Sharing Tab and click on "Share". *You must be the admin of both machines and you may need both machines to have the same Username and login credentials.

  5. If you don't already have an "Everyone" under the name, click on the dropdown and select "Everyone".

  6. With Everyone selected, click on share.

  7. Find the path to this folder by right-clicking on the folder and going to properties, then the share tab again. Here it will say Network Path: and give you the path. Notice that "Media" is left out, you will have to add "\Media" to the end of this path.

  8. Now on the Master Computer, from File Explorer, right-click on the "This PC" icon and press "Map Network Drive"

  9. Select an unused Drive Letter, like M.

  10. Under the folder, type in \\ + the ip address of the client compuer + the path (minus the computer name). In this case, I would type \\192.168.1.41\Users\Demon\Videos\00_SharedProject\Media

  11. Keep reconnect at sign-in and press Finish.

  12. Now you can access this folder from your master machine, and anything you add to it will automatically be put into the folder.

Shared folder for Project.

Using the same method as above, let's go to the client machine's Project folder and create a shared drive for that.

Assimilate stores it's project files here: C:\ProgramData\Assimilator\Project\

Share the "00_SharedProject" folder. I used drive letter "R", but you can use any drive letter you want.

Use FreeFileSync to push new changes

We're going to set this up so that if we add new media to our master machine, we can check for changes and then push any new content to the client machine(s).

On the left side, let's browse to the location where we will store the media for the master computer. On the right side, let's browse to the shared drive, in my case, that is M. Let's also change the Sync Settings so that it only Mirrors from the Master to the Client machine. We can do that by clicking on the area next to the green settings cog, and changing it to Mirror.

Now let's save this configuration by going to the save or save as option on the left.

To check for changes, press the compare button. To push these changes, press the Synchronize button. *If pushing project changes, you may need to close Assimilate on one or both machines, but Media you should be able to push at any time.

Now let's find the IP Address of the client computer. You can do that by pressing the windows key and searching for "Command Prompt". In the command prompt, type in ipconfig, then find the relavant IPv4 address. In this case, mine is 192.168.1.41. Save this for later.

Go to , download and install FreeFileSync. After it is installed, you may need to manually go to Program Files and find it to open it.

🖥️
https://freefilesync.org/